Creating Your First Map in ArcGIS
ArcGIS is a versatile and effective technology in the field of Geographic Information Systems (GIS). Learning to make your first map in ArcGIS gives you a world of possibilities, whether you’re a professional geographer or a curious adventurer. Let us walk you through the steps.
A Brief Introduction to ArcGIS
Esri’s ArcGIS is the gold standard in GIS technology. It enables users to evaluate spatial data, manage data, and eventually produce beautiful, comprehensive maps. This versatile tool can be used for everything from urban planning to environmental conservation.
- Install and Open ArcGIS Pro First, you need to install ArcGIS Pro. Once installed, open the program. Make sure your computer meets the system requirements, as GIS software can be quite demanding on system resources.
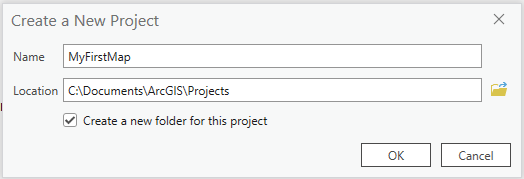
- Create a New Project From the start page, click on “New”. Choose a template for your project, “Map” is the default one. Give your project a name, choose a location on your computer where you want to save it, and click “OK”.
- Get to Know the Interface Familiarize yourself with the interface. You’ll see the Map view, where your map will be displayed, and the Contents pane, where your layers will be listed. Above these is the Ribbon, which has several tabs each containing different tools and commands.
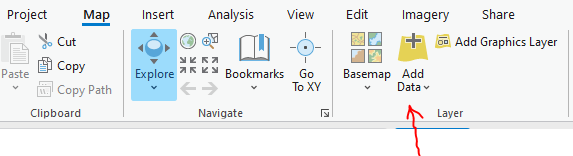
- Add Data To add data to your map, click the “Add Data” button on the Map tab in the Ribbon. Navigate to where your data is stored. This could be shapefiles or geodatabases. Click “OK” once you’ve selected the data you want to add.
- Inspect the Data In the Contents pane, you’ll see the layers you’ve added. If you click on a layer, the layer’s properties will appear in the pane on the right. Here you can see information about the layer, like its source and coordinate system. If you right-click on a layer in the Contents pane, you can open the Attribute Table, which shows the data for each feature in the layer.
- Symbolize the Data You can change the way your data is represented on the map. Click on a layer in the Contents pane to select it. In the Ribbon, click on the Appearance tab. Here you can change the symbology of the layer, such as its color or shape.
- Label the Data If you want to add labels to your features, click on a layer in the Contents pane to select it. Then in the Ribbon, click on the Labeling tab. Here you can add and customize labels for your features.
- Save the Project Click on the “Save” button on the Quick Access Toolbar, or click “File” -> “Save” to save your project. This will save everything, including the data, layers, map, and layout.
- Export the Map Once you are satisfied with your map, you can export it to share with others. Go to “Share” -> “Map” -> “Export Map” to export it as an image or PDF.
- Close the Project Once you’re done with your project, you can close it. Go to “File” -> “Exit” to close ArcGIS Pro.
Keep in mind that this is only a rough outline. GIS is a difficult field with many tools and methodologies, and ArcGIS Pro has a lot more to offer. To learn more, consult ArcGIS Pro’s help and documentation, as well as online resources, tutorials, and forums.